The 10 Commandments of Fonts & Typefaces

The 10 Commandments of Font Usage: (according to Rebecca)

  1. Don’t mix a script with a block type with a serif. It’s poor taste and it only works in very few circumstances. So watch out!
  2. Downloading fonts: great idea! Linked fonts: not so great. Make sure to travel with your typefaces in your external hard drive or memory stick.
  3. Display fonts are fun! USE THEM FOR DISPLAY ONLY!
  4. Make sure that your text is legible on the page and that you’re achieving a good balance of text color on the page or surface.
  5. Don’t use Comic Sans or Papyrus. Seriously.
  6. Experiment with some of the more “vanilla” typefaces in order to create something artistic and interesting.
  7. Achieve a sense of visual hierarchy by modifying your text to reflect the needs of your piece.
  8. Research the fonts that are used by all the companies you like so that you can create something new and exciting inspired by your favorite brands.
  9.  Helvetica is great, not boring. Use it.
  10. A good font can make or break your piece, so get to work, kid!


Sneaky reminder: Download music/video from YouTube

Sometimes we really need a certain song or scene from a movie but we just don’t have it on any file format…apart from YouTube. While I’m not encouraging anyone to engage in anything illegal, this method of downloading the movies or music can be really helpful when workshopping footage and audio that might not get used in a project but that you would otherwise have to pay for – and it’ll all be done in the right file format!

There are a lot of different sites that do this kind of work but I especially like Online Video Converter. Look at all the options it gives you! Try it out sometime and let me know what you think about this method.

Screen Shot 2019-05-08 at 3.50.29 AM.png

https://www.onlinevideoconverter.com/youtube-converter


Good On You: Ethical Fashion App

So there I was, sitting down doing research on sustainability for this project, and I grabbed my phone for an Instagram break. To my surprise, Emma Watson popped up and in her caption, she mentioned an app called “Good On You” which shows you how ethical (or unethical) your clothing manufacturers are while also helping you discover new ones. It factors in worker’s rights and safety, use of materials, and other sustainable markers into the rating it gives each company. It’s definitely an eye opener when we realize that just like cosmetics, it can be shocking how much waste and unethical practices happen in the fashion industry – and this app helps our eyes to be opened.

Screen Shot 2019-05-08 at 3.44.49 AM

You can find this in the Apple iOS app store (unsure about Android users!).

Tutorial: Simple 3D Box in Photoshop

Today I’m going to show you a SUPER simple way I like to create boxes in Photoshop. This was really useful during my Time Motion assignment – hopefully, it can be of use to you as well. Enjoy!

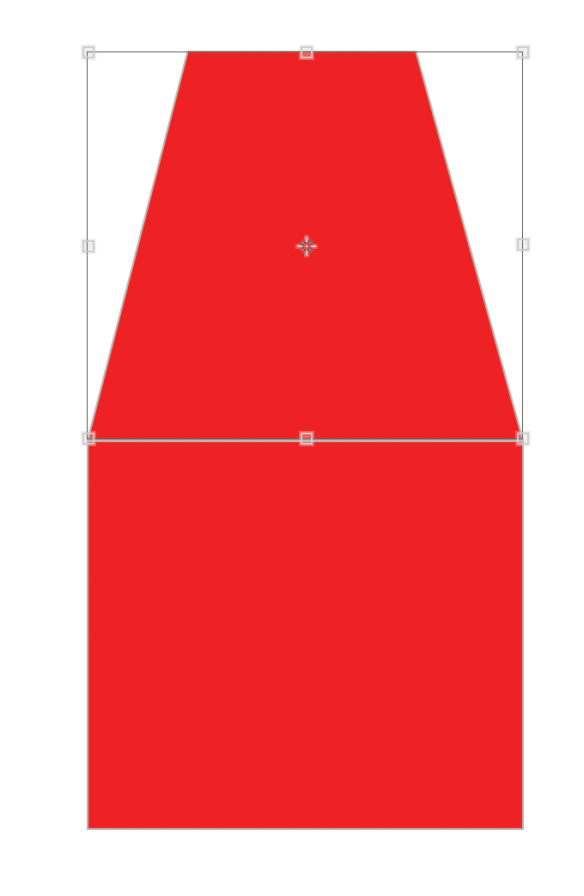
  1. Create a rectangle or square in Photoshop. Duplicate it.
  2. Vertically stack the boxes on top of each other, so the bottom of Box 1 touches the top of Box 2.
  3. Select the top box. Go to Edit > Transform > Skew. Skew according to what angle you’d like your corners to be at.
  4. Use the transform box to “flatten” the center of your top box.
  5. Congratulations! You just made a super simple 3D box in Photoshop!

I’ve included a little photo tutorial on this as well. Enjoy!

Screen Shot 2019-05-08 at 3.36.17 AM

Step 1. 


Screen Shot 2019-05-08 at 3.36.57 AM

Step 2. 

Screen Shot 2019-05-08 at 3.38.29 AM

Step 3. 

Screen Shot 2019-05-08 at 3.38.40 AM

Step 4. 


Spotlight on: Upwork

Today I’m choosing to highlight one of my favorite new sites: Upwork. Upwork is a site that allows freelancers in all different fields to find work. A good friend of mine has used Upwork for years and has found a lot of success with it. They have all different opportunities, not just for creatives: they have engineering, customer service, & web work, just to name a few.

Upwork has a great client base, including big companies such as Microsoft, GE, Dropbox, and Airbnb. It allows for a lot of options, both for those looking for jobs and those seeking applicants. You can use it to call, chat, & share files with your partner as well, and pay is hourly or fixed income paid through Upwork. Overall, it helps keep a lot of integrity in freelance work and it keeps your workflow organized through the communication tools it uses.

Screen Shot 2019-05-08 at 3.25.53 AM.png

Screen Shot 2019-05-08 at 3.30.03 AM.png

Visit them at www.upwork.com! 

Gritty Texture Tutorial

This is a little tutorial on how I learned how to create gritty vector textures in Adobe Illustrator. I’ll definitely be using this in future projects. Enjoy!

  1. Grab a sheet of paper and some objects. A match, a knife, some paint, a hammer, your teeth, whatever you want! Get to work on distressing the heck out of that paper, as bold or as subtle as you’d like.
  2. Scan that piece of paper into the computer at 600 dpi- you want these textures to be a high resolution so you can zoom or scale as needed if you wanted to use it in raster.
  3. Prepare your texture by importing your image into Photoshop and adjust the levels & threshold until your image is strictly black and white – you want to prep your texture for importing into Illustrator for use with the Live Trace tool.
  4. Import your image to Illustrator. Go to Object> Live Trace > Tracing Options to trace your image (this may take a bit of time depending on your file size). Use adjustments to your trace to find what works best for the texture you’re trying to achieve. When complete, hit Expand.
  5. Time to remove the white from the texture! Use Command-A to select all, then Object > Ungroup. Using your selection tool (black arrow), click on the corner of the white area and then select> same> fill color. Now you can press delete to get rid of the white!

Now you’ve achieved the perfect vector texture. Try this out at home and let me know how it works for you!